Archive for the ‘External Features / Gables / Letterboxes’ Category

Wasp on a nest. This fantastic image was expertly captured by Cordan.

Yesterday we brought you how to prepare to remove a wasp nest safely and today we will provide the detail behind each of those options.

Removing the wasp nest safely:

1. Freeze / drown the wasps

This option requires two people to implement, and for you to have a large plastic box with a tight lid that will seal the wasps inside.  It is important to ensure that the plastic box is larger than the wasp nest to make this successful.  The way this technique from eHow works is to have one person hold the box under the nest and the other to clip the nest from its position using a long handled pruning tool.

As soon as the wasp nest lands in the the box, the assistant will need to quickly seal the lid over the wasps.

My issue with this technique comes into play here.  You will then need to have either a big enough freezer to place the box inside, which will allow you to freeze the wasps, or you will need to fill your bath tub with water and use a brick on top of the plastic box to submerge the wasps till they die.  Using a clear plastic box is obviously going to be easier to judge the results.

The main thing for me with this technique is that you need to bring the wasps into your home and for me I just don’t like that idea no matter how sealed they are.

2. Burn out the wasps

I don’t even want to think about this one, there is far too many things that can go wrong with trying to burn out wasps, especially as wasps are most common in the summer when the risk of fire is so great.  In addition fire really aggravates the wasps and you are much more likely to get stung, not to mention your exposure is longer.

3. Use a pesticide

This is a really good option for many people.  Ensure that you have your assistant on hand to hold the ladder and help you with the application.  Both of you should be well covered and you should have fully read the instructions and warnings prior to using it.

If you have kids or pets make sure that they are well away from the area that you are going to spray and that you quarantine the area for some days after.  Better still go for an all natural pesticide.

Another tip is to look for one with a long distance spray, which will enable you to stand well away from the wasps.  Try to ensure that you are not directly under the wasp nest either as this is where the wasps will be most likely to attack.

Spray the wasp nest in one long continuous spray covering as much of the surface area of the nest as you can.  Then remove yourself from the scene.  If you like you can repeat the process the following day and then you should be right to safely remove the nest 24 hours after that.  Ensure that you are still fully protected on both of these subsequent tasks.

4. Use a Soap and Water spray

This is my favourite method as it is safe to use, will not leave any chemicals anywhere that kids or pets may come into contact with them and it is effective.

Make up a large batch of very soapy water and using a spray gun or something similar spray and coat the wasp nest thoroughly.  Like with a pesticide, do one continuous spray to coat as much as possible and then remove yourself from the scene.

Soap and water clogs the wasps pores and weighs it down.  Eventually the wasp will suffocate and die.  You are likely to find clumps of wasps on the ground after using this method, but remember it may take them some time to die and they are still able to give a mighty sting at this time.

Use a long handled pruning tool to cut down the nest a few days later.  Be prepared just in case there are more wasps.

A great video on this process is here.

Summary:

All in all remember to protect yourself and ensure that this video is not you – Not only is this person stung but they could have been seriously harmed.  We strongly recommend that you use your assistant to help you rather than video you! 🙂  More information on how to kill wasps can be found here.

The wrong way to take down a wasp nest.

Wasp nest. Image courtesy of Corey Carter

A wasp nest can be a very difficult problem if it is one right next to your home.  The reason is obvious, the wasps don’t generally take kindly to being relocated so will react with anger trying to attack those that it sees are trying to upset their happy house, after all, they specifically chose that spot over all the others on offer.

None the less as the actual home owner, it is fair enough that you don’t want these irritable squatters sharing any part of your house or garden.  So today we are going to take you through how to safely remove that wasps nest.

The key to this is ensuring your safety throughout the whole process.

Preparation:

1. Get an assistant – removing a nest is a lot easier and safer with two people.

2. Cover up – the goal is to ensure that as much of your skin is covered.  Think protective clothing, like a hat, veil, gloves, long sleeve t-shirt, long pants and socks.  There are a few extra tips with your dressing, such as to tuck your pants into your socks to ensure no wasps fly up them.  Wear a jumper or long sleeved t-shirt over a button up shirt (less areas of access, i.e. between the buttons), tuck a layer into your pants.  With your gloves get the kind that you can tighten around your wrist.  As you can see you are trying to seal up as much of yours and your buddy’s surface area.

3. Locate your wasp nest and plan your attack – It is best to locate the wasp nest in the day, but leave treating it until the evening when the wasps are less active and less likely to pose a threat.  Wasps are attracted to light so avoid using a flashlight.

Options for removing the wasp nest:

There are four main ways of attacking a wasp nest, they are:

  1. Freeze or drown the wasps
  2. Burn the wasps
  3. Use a pesticide
  4. Use a home mix of soap and water.

Tomorrow we will go through each of these to show you the best way of killing your wasp problem.


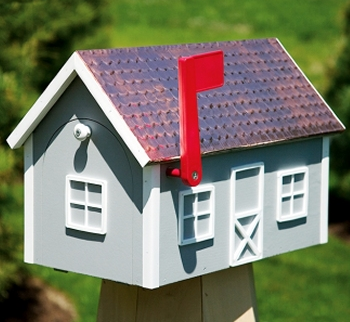
A painted and designed letterbox from American retailer The Lighthouse Peddler

Whether you have a brick or metal letterbox it is possible to paint it up so that it looks fantastic and individual.  Earlier in July we brought you a great list of ways to build your own letter box.  Many of these were wooden, and desperately cried out for some decoration, so here it is, the follow up to our DIY Letterboxes feature.

1. Keeping the wooden look

Having a beautiful wooden mailbox can be great, but to keep it looking good you will need to ensure that you finish the job.  First sand the letterbox with sandpaper.  Choose an exterior stain to suit the colour of wood you want to choose and give the letterbox two coats.

2. Painting your wooden letterbox

Another option is to paint your letterbox with one or more colours.  This can be great and add a vibrancy if you like bright colours, or blend the letter box with the garden by going for muted and natural colours.  Again sand the letterbox to remove any rough edges and round the joins.  Then choose a good quality oil based exterior paint.  Give the letterbox a good coat, then sand it slightly to remove streaks and apply the second coat.

3. Painting a metal letterbox

If you have purchased a metal letterbox and wish to paint it a different colour you cannot simply buy exterior paint and wack it on.  It is likely to end up streaky and will flake easily.  If you have painted or tried to paint your letterbox before sand it down before you start to remove an lumps, bumps or streaks.

Select a primer that is designed for metal and is in a spray can, use this to completely cover your letterbox.  Give it a light coat and this way you will not get any streaking or running.  Then select a spray can in the colour of your choice and go over the dried primer.  Ensure that you do not go too heavy otherwise you will get streaking.  If this should occur sand it off and try again.

Check out the DIY Bargain Bin for all your letterbox needs and your Paint, Oils, Stains, Varnishes and Painting Supplies.

Our House from Nine MSN Letterbox plan.

Well if you liked our collection of DIY Sheds, we now bring you letterboxes! Hopefully we have something to spark your creative fancy, if not, you can view the DIY Bargain Bin External Features / Gables and Letterboxes to find an already built model to suit your tastes!

1. Our House has a cute little wooden one that will cost you about $60 to make including the timber, hinges, knobs and screws.  Remember to check out the DIY Bargain Bin for all your supplies.

2. BuildEazy have both a great mailbox and mailbox stand that you can build yourself.  The great thing about this mailbox is that you do not have to build the stand as the mailbox would be perfect against a fence or post.

3. Arch Chemicals bring us a different idea more along the line of an American style mailbox.  This one includes the mailbox, the stand and a little planter.

4. All Wood Working Plans have a great oak top opening mailbox that would be great for lots of mail, but is also so nice that you could create inside the your home as a storage solution.

5. Lee’s Wood Project – Has another stylish letterbox for your home.  It incorporates a ginger bread trim and window shutters to give it a storybook charm.

6. Wayne of the Woods shows how to create a very simple mailbox stand and how to attach your store or DIY Bargain Bin bought tin letterbox.

7. eHow provide a step by step brick mailbox design if wood is not your thing.

8. The Do It Yourself crew also have a free brick mail box plan.

9. Australia’s Home Hardware gives a beautiful little timber letterbox with in a full brochure.  This is a cute box, but could me made your own with some paint!

10. Bunnings like Home Hardware, offer a downloadable letterbox instruction booklet in PDF format.  Like the Home Hardware one, it could also do with a lick of paint.

Don’t forget, you can find all the material to create your home DIY mailbox from the DIY Bargain Bin, or alternatively get your fully finished letterbox from the DIY Bargain Bin External Features / Gables / Letterboxes section.